Showing posts with label Paint. Show all posts

Monday, 25 July 2016

DIY enamel dots

Hey guys,

As a quick warning, this DIY didn't really work all that well, so I wouldn't get your hopes up for seeing perfect little dots that can be used for delicate things. They kind of look like little slightly-coloured splodges...

I saw this idea on Pinterest, and I thought, 'yes, I can do that with my glue gun' (I actually can't, and I burnt myself a few times). I have since done a little more research into it, and the ones I saw were actually melted beads. Pinterest: 1, Megan: 0... However, I thought you might like to see my attempt!


I was using my glue gun for them, but you definitely need to make sure it is very very hot so the glue forms a dot, rather than something that resembles a Hershey's kiss (If you don't know what that is, its a little teardrop shaped chocolate with a flat base). I was gluing them to the back of an old notebook I have (yet another mistake!) which turned out to be a really bad idea, because I couldn't get them off very easily. I had to try and pry them off with my nail and ended up breaking some of them in half. Oops!


The ones I did manage to get off were ok I guess, they were quite cool little blobs. I painted them with a coat of acrylic paint (not a good idea to do it after you take them off the sheet), which looked a little bit patchy in the end. By this point though, I was so done with the whole thing that I just gave up and have since decided that should I need any enamel dots in the future, I will be buying them, and not trying to make them with a glue gun. The only one that came out ok was the tiny red one on the far left of the row! I might keep that one, but the rest will be being relocated to the bin very shortly!


Don't you just love it when a DIY fails! (That was sarcasm, I don't actually love it)

I am going away on Saturday, so hopefully I will have written the posts for the next 2 weeks by then, I'm also hoping to post twice a week whilst I'm away, so stay tuned for some great ones! They will be scheduled, so there may or may not be any tweets about them, and I'm not 100% sure which days they will be up yet, so I'll let you all know closer to the time! I hope if you try to make enamel dots that they turn out a lot better than mine did!

Love you all 
x

Tuesday, 19 July 2016

Rock monsters

Hey guys,

Sorry this didn't go up yesterday! The paint I used took slightly longer than I wanted it to to dry.

I saw some rock monster photos on Pinterest a few weeks ago and I really loved the idea of them, so I decided to go out and find some random stones in my garden and put them to good use. I found 3 of various sizes so I could try out some different looks. I think they went pretty well actually.


Before I painted them, I had to wash the rocks slightly as 2 of them were covered in moss on one side from where they'd been in the garden quite a while. They were still pretty green, but I figured that since the paint I was going to use was acrylic, it would cover over it.


Depending on which paint I was using, some needed 2 or 3 coats, whilst others only really needed 1. I painted all of the rocks first, then drew out a few face ideas on a piece of paper so I could decide which ones I liked best. To draw on the faces I used black sharpie for the blue and red rocks but black acrylic paint for the purple, as the sharpie didn't really show up very well. White acrylic worked well to create the teeth, but I would suggest using a thin brush, as bigger ones are a lot harder to be precise with.


For the eyes I decided to use 2 different sizes of googly eyes. They look super cute stuck on (I could only find super glue, but I'm pretty sure any other type works just as well) and give them a cute yet fierce look.


I hope you enjoyed this post, I would love to see if you decide to make these, so feel free to tweet me (@_littleblog)! I hope you all have a lovely rest of the week, I hope it's not too hot or too cold for you all!

Love you all 
x

Saturday, 6 February 2016

Nail Power!


Hey guys,

Guess who forgot to take photos until 5 o'clock today... This girl *points thumbs at self*... fun times. Although, I did make some tasty cupcakes. So I guess something good came out of it.

This post will probably fail, because, to be honest, I'm not all that great at doing nail designs anymore. I used to do some good ones, when I was 13/14, but I think I've just gotten out of the practise of it.


The first one is supposed to be a galaxy look. It started off ok, when I had only done the base coat, because it was just a base coat. It then proceeded to go downhill from there really. I wanted it to look all cool and hipster like all the photos on
This was what it actually looked like:


Please ignore the random bit of fluff that decided to position itself right at the end of the nail and only make itself visible in the photos afterwards...
I tore a makeup sponge (that I hadn't used) up and used the rougher edges to dab the blue, purple and white onto the dark background in a kind of galaxy-ish pattern. (not really a pattern at all) It actually looked really cool at that point, It was blended and splodged pretty well, and I was actually pretty impressed with myself. That was, until I tried to add some glitter and poured it into a big mound in the middle...


I didn't use all of the polishes in the photo above, and unfortunately, I'm out babysitting at the moment so don't have access to them to tell you what they're all called. If I remember to add it tomorrow then I will, however, it is highly unlikely.


The torn up makeup sponge actually provided a pretty good stippling sponge for the 'clouds' of colour as it had a quite nice rough texture. This meant that when I painted some polish directly onto it, there were still spaces that meant the colour wasn't totally overpowering.

I reckon that the design would look a lot cooler actually on my nails, because there would be a group of them all together. However, I think I might leave out the glitter next time and just go for a plain top coat!

I hope you all have a lovely week!

Love, Grace x

Saturday, 17 October 2015

Painted Vase

Hey guys,

I promised a DIY post last week and here it is, and on time for once! This week feels like it's gone so quickly, I can't believe it's the weekend already! I must have missed a few days or something!

Today's post is painted vases. This was an idea I saw a post on Pinterest about, although, I think they did it with wine bottles instead. Painting the inside just livens up the piece a little and makes it different to any others.


Mine hasn't actually come out exactly as I wanted it to. I mixed the paint with PVA glue to try and make it go further and spread more evenly but that seems to have added a lot of tiny air bubbles which I don't like! The top is a little patchy but if you look into the vase, the coolest thing is that it looks like tiny stars in different constellations on the bottom. I was going to have it so that the top wasn't painted (hence why there's sellotape around it in the first few photos) but then decided against it. I also probably should have used masking tape but unfortunately for me, I couldn't find it! By the way, sellotape does NOT work in the same way! Although, I'm sure a lot of you already know that!


The vase I had was £1 from a charity shop on the high street and I'm fairly certain that most charity shops will have vases, and the same goes for most other shops (if you want to splash out on a more expensive one)! The paint I used was just regular wall paint (which probably didn't help with the air bubbles and patchy-ness!). I'm not sure if it helped at all, but I mixed PVA glue into it (it did make it slightly more fluid though), although you may want to leave that step out.


To actually paint it I just poured the paint into the vase and swirled it round until it was completely covered (it looked pretty cool when it was partially done)! Once it was covered, I left it upside down on a piece (or 4) of paper to let the excess run out. This is what other people tend to do with things like this, so I figured it would probably be a good idea!


It needs to be left for quite a while to dry out (overnight is probably best) and you want to make sure the inside is completely dry before putting it to use. I love the look of the paint behind the glass and it just goes to show how much you can do with bits and pieces that would usually be overlooked for more fashionable or 'cool' items.


I hope you have a lovely week, and maybe don't chuck a load of paint into your best vase straight away! It also works for jars, which you can then put tea-lights (or LED ones) into to create a cute little candle holder.

Love, Grace x

Saturday, 3 October 2015

Paint(ed) Pots

Hey guys,

I hope you've had a lovely week! Before the post actually starts I just want to explain a few things to a couple of my friends who I sent this link to without explaining. Hey guys... You probably didn't know what this link was when I sent it, but I wanted to tell you that for the last year and a half, I've been writing this blog. Originally I started writing it as the skills section for my DofE, but it's become one of my favourite things to do; I love it! I've wanted to tell everyone about it for a long time but have always been too scared to; it was especially hard when our mock and real English exams included a question about having to write a blog post. I mean, there's just a shed load of irony in that! There wasn't a particular reason why I was scared, you guys aren't monsters, I think I also liked just having something that no-one else knew about. Anyways, welcome to my little internet space, I hope you like it, and I'm sorry for not liking Matched!


Back to the post, This idea came to me as I was making the key frame last week actually. I saw a mossy old terracotta pot down the side of our house and instantly knew I could make it cool! My mum also gave the idea of wrapping string around the top, which was the difficult bit as it really didn't want to stick! I think the post is a small one, I've seen much larger ones before but It would work with any size (as long as you had enough paint). I think the overall look would look really cute on the tiny pots that you can get, they'd look so sweet!


Anyway, to do this, you'll need; paints, paintbrush, a pot and newspaper/something to put the pot on when it's wet so it doesn't make a huge mess. PVA glue and string are also optional. For the paint, I was using the leftovers that I mentioned last week and I used 'Antique Ivory' and 'Azure'. You can choose whether or not to use 2 colours, I just kind of wanted to see what it would look like.


(Who remembers Art Attack? I used to love watching it and it's probably what made me so creative! I think this PVA is a little old now.)


I painted the outside first to see how the paint would go on, and I was pleasantly surprised! It went on really well and it only took about 2 coats to make it look smooth. The inside was a lot harder though! It took about 4 coats and still looks a little patchy, even though both paints are exactly the same make. I don't really mind about the patches though, they're squished into the bottom corner so aren't overly visible. If you want the rim to be neat and not have splodges (like mine does) then you may want to use some masking tape. I couldn't find any, even though I only had it last week!


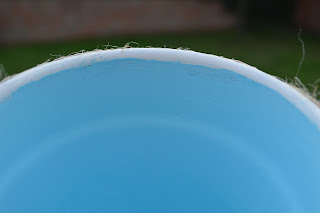
If you want to wrap string around the top, put some PVA in an old tub or bowl and run the string through it to start with. This should coat it evenly and help it stick more. (Also, start from the bottom of the part you want to cover as it's easier). You will also get a little sticky at this point so either keep some kitchen roll or something to wipe your hands on, or wait until it dries and peel it off. I remember painting my hands all the time when I was little, just so I could peel it off again afterwards! Oh the things that entertain kids! If your string is quite fluffy then it may look a little slicked down (like when hair has too much gel in it) but once it's dry, you can rough it up a little by brushing your hands over the top.

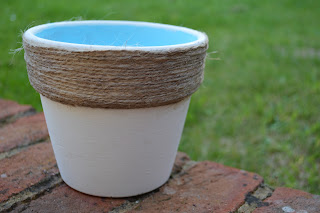

This post has a sort of summery feel to it but because the colours match my room, I think it will look super-cool with a fake plant (I would probably kill a real one!) or something cool in it! If you used outdoor paint then it would also look awesome if you had a collection of different coloured ones full of flowers!

I hope you all have a lovely week! Hopefully next week will be a September Favourites post, if I can think of favourites to write about! My mind always goes blank when I try to write a favourites post and I can only think of the same things as last time, or chocolate!

Love, Grace x