Wednesday 31 December 2014

Happy New Year!

Hey guys, 

I can't believe it is New Years already!! For those of you on the other side of the world, how is 2015 so far? (I feel a lot more optimistic about 2015 than I did 2014 if I'm honest, so I think it is going to a brilliant year!)

This year has been amazing! This just so happens to be my 50th post! I promise there will be something special on Saturday as my first post of 2015. I have loved writing every post on here and I hope you have all enjoyed reading them just as much! I can't wait to write even more!

I just wanted to take the opportunity to wish you and all your families a very Happy New Year and I hope 2015 is full of happiness and luck for you all! 


Until next year!
Grace
X

Thursday 25 December 2014

IT'S CHRISTMAS!

Hey guys, 

I just wanted to wish you all a very merry Christmas and hope you have a lovely day wherever you may be! Thank you to all of you who have read my blog for the past few months, I hope you have enjoyed it and I look forward to writing more!


Until next time,
And a very Happy Christmas to you and your families! 
Grace
X

Wednesday 24 December 2014

Snowflakes

Hey guys!

T'was the night before Christmas, when all through the house
Not a creature was stirring, not even a mouse...

Wow! I can't believe it is Christmas Eve already! It seems like just yesterday I was blogging ideas for Halloween and talking about Summer! Now, I'm talking about snowflakes and Christmas cards! 

Now, you're probably thinking 'don't be daft Grace! I already know how to make paper snowflakes!' You may be the champion at making snowflakes but I have always failed slightly! They all end up looking a bit square and not very delicate. I was browsing Pinterest (as I do on quite a regular basis now!) one evening and I came across these patterns and a method for cutting a kind of circle from the paper. 

If you get an A4 sheet of paper and fold part of it into a square. Then fold it in half again so that it looks like a small triangle. 


Ever since I was a child I have loved making paper snowflakes. There's just something about having a delicate little decoration that is completely unique and you can be  proud that you have made it yourself. (However, I always managed to get little paper cuttings everywhere and this wasn't very pleasing for my parents!)


Models for paper snowflakes.  Site is in Italian but you can get the idea from the image. Just cut out the darker area.

These templates make really delicate and pretty snowflakes (I feel like I've used the word 'delicate' way too many times so far!) and you can hang them up or stick them to your windows to create a white winter wonderland just for you.

There was also another idea I found, and that was 'snowflake ballerinas'! They look effortlessly cool and pretty hanging up. If you find my Pinterest account there are some links to other blogs with templates and ideas you can use. 


If you cut out one of the templates (or draw your own) and then make a fairly big snowflake, you can slot them together and create a beautiful tutu for the ballerina. If you cut a thin slot in the center of the snowflake you should be able to slip it on over the ballerina so she can wear it like a skirt.


You can then string them up to create a beautiful decoration!

Until next time
Grace
X

Tuesday 23 December 2014

Gingerbread

Hey guys,


It's only 2 more days until Christmas! So, for today's post I'm going to share a couple of really sweet recipes! One is a simple sugar cookie recipe and the other, gingerbread. I've never actually made any gingerbread but the recipe has some good reviews and looks like a good, easy to follow one so I thought it would be a good one to share.

~Gingerbread~

For the gingerbread, you will need:

350g of plain flour (plus extra for rolling out)
1 tsp of bicarbonate of soda
2 tsp of ground ginger
1 tsp of ground cinnamon
125g of butter
175g of light soft brown sugar
1 free-range egg
4 tbsp of golden syrup

To decorate:
Writing icing
Cake decorations

You could cut out gingerbread men shapes, decorate them or leave them plain and give them as gifts. You could also make a small hole in the top of the biscuit before baking and thread it with some string to use as decorations for your tree. 

You need to cook the cookies at 180ºC (350ºF/ gas mark 4) for 12-15 minutes until they are a light golden brown.

~Sugar Cookies~

This recipe is one that I have tried multiple times and can confirm, they are very nice! It is from my own recipe book and I haven't managed to find an online copy yet. You basically mix all of the ingredients together in a bowl and then leave the dough in the fridge (or, I prefer leaving it in the freezer) for about 30 minutes. Then roll it out, cut out the shapes you want and bake. They come out very light and sweet and you can decorate them in any way and cut them into any shapes.

You will need: 

115g of plain flour (plus extra for rolling out) 
75g of butter
25g of icing sugar

That's it believe it or not! Only 3 ingredients! You can also add cocoa powder or vanilla essence if you wish, but I think they taste just as nice without any extras.

To ice the biscuits, mix a teaspoon on water with as much icing sugar as you need to make the mixture thick but still kind of runny. You can also add some decorations like sprinkles to top the cookies off. Cutting them into fun shapes makes them cool too, like Christmas trees or gingerbread men shapes.

You will need to put the cookies into the oven for about 10-12 minutes at 180ºC (or about 350ºF/ gas mark 4) until they are golden brown on top.


Sorry this post only had one picture! I hope you enjoy these recipes and can share them with your friends or family for a festive treat.

Until next time
Grace
X

Monday 22 December 2014

Clear Baubles

Hey guys, 

It is now officially the eve of the eve of Christmas eve! How much of a mouthful is that! In simpler terms, it is only 3 days until Christmas! I'm not sure if you can tell but I happen to be a little excited! I think it may be because I'm so excited about seeing some of my family, who live in Australia, for the first time in 2 and a half years! I may try and take a few pictures to share with you guys!

So, back to business. Today's post is going to be something that I think is quite cool! Baubles filled with a filler of your choice! Seriously, you could fill a clear bauble with anything from buttons or beads to sprinkles or glitter! It gives you something that is entirely your own and completely unique at the same time.

Start off with a clear plastic bauble, I think the internet is probably the best place to find one of these as I searched in a few shops and couldn't find anything. The best ones are any that you can take the top fixing off of, even if you have to glue it back on later. My bauble is actually a bit of a cheater since I was given it as an early present with some socks inside. However, it is split into two halves which made it a little difficult to fill whereas if you have a bauble that you can remove the top, it makes it a little easier. 


I actually saw this idea on, yes you guessed it, Pinterest and thought it would be quite cool and quirky and would make a good present for someone or would be good as a tree decoration. 


For my bauble I used some different coloured beads. I had to fill each half at a time and then quickly squish them together. A few of the beads fell out but not a many as I was expecting! It actually looked really cool! I just wish I had been able to leave it like it but the halves didn't really want to stay together so I had to take the beads out again. 


I hope you like this idea, I think it is quite cool and would make a lovely homemade gift for someone.

Until next time
Grace
X

Sunday 21 December 2014

Thumb Print Fairy Light Cards

Hey guys,

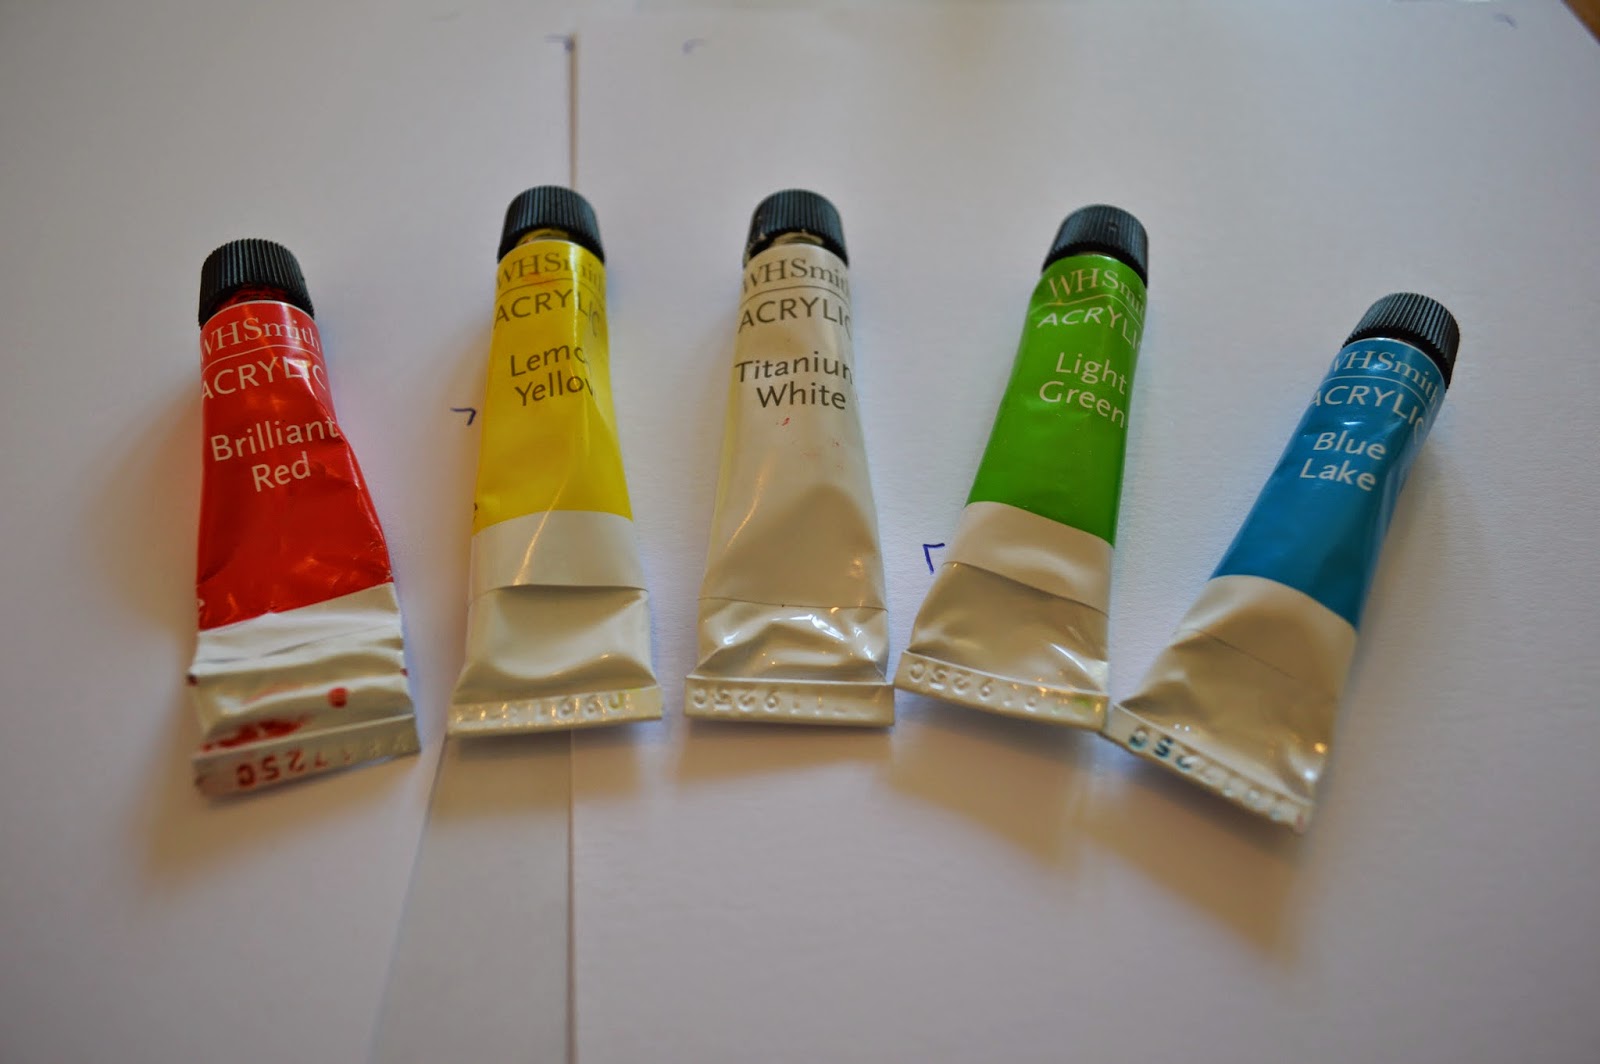
This idea may seen a little strange but when I saw a picture on Pinterest I knew I had to try it and share it with you guys! I think these cards are really cool for Christmas and are not something that you see everyday. It doesn't even have to be a card, you could frame the picture and use it as a keepsake for a child's fingerprints or just as a festive decoration. You can use as many different colours as you like but since I only had a few acrylic paints I was limited to the colours I had. Acrylic paint is probably not the kind of paint that was intended for this craft so poster paint or any other paints may be better for it.

For this card you will need: some paints in different colours, card, a black felt tip pen or marker, a paintbrush and possibly a mixing pot to make it easier to put the paint on your fingers. You don't have to use your hands for this project, you can use a sponge, Q-tip or even cut a potato into the shape and use it as a stamp.


First you will have to fold the card in half and turn it so it is landscape. This will be the card base.


Now comes the fun bit! You get to paint your thumb or fingers (or whatever other method you decided to use) and then put them onto the card to create the 'bulbs'. Create the 'bulbs' through the middle of the card at different angles but not so far apart that you can't join them up afterwards. You can add as many lights as you like, the more the merrier! It is probably best to leave the card to dry for an hour or two before using the pen as you may not get the best results if the paint is still wet or tacky.


Once the paint is dry, you can use the black pen to add in the light fittings and the wire that joins them up. This is completely down to you to decide how it will look but remember to join up all of the lights otherwise they will appear to be floating! 


I also added 'Merry Christmas' at the bottom for an extra festive touch but you could write or draw anything you like.


Have a lovely day guys!

Until next time
Grace
X

Saturday 20 December 2014

Snow Present Tags

Hey guys,

Are you excited yet? It's only 5 days until Christmas! This post is going to be 'how to make your own snowy present tags'. These tags are really sweet to give to family members or friends and they can add a little extra decoration.


First up, you will need: card, scissors, pens or pencils, glue, (string and a hole punch are optional) and cotton wool. I used pritt stick but you can use PVA or any other type of craft glue. I also only had wool but you can use any type of string you like.


Draw out a tag shape on the card, not too big or small but a good size for a picture to be drawn on it. Cut it out. You can use this cut out as a template for other tags if you are going to make more than one. just place it on the card and draw around it again and again until you have as many tags as you like.


Next is the fun bit! You have to draw a scene on the tag that contains an element of snow. It could be a stable, a house with snow on the roof, a snowflake or a snowman. It could be absolutely anything!


Now you can colour in the image, make it as colourful or as pretty as you like but don't colour where the snow is going to be as you won't be able to see it beneath the cotton wool.


Once you have your little scene as you would like it, you can put some glue in the areas where you are going to stick the snow. stick the cotton wool onto these ares but it is a good idea to break it up into smaller pieces first so it is easier to stick down.


The last step is to hole punch the top of the tag and thread some string (or wool in my case) through. If you don't want to hole punch the tag or just don't have a hole punch you can just tape the top onto the present so that it is a little flap tag. Don't forget to add a Christmassy message and the name of the person the gift is for onto the other side!


I hope you like these tags and will be using some on your Christmas presents (that is if you aren't really organised and already have them all wrapped and labeled!)


Until next time
Grace
X

Saturday 13 December 2014

How to: Dream catchers

Hi guys,

Wow! It feels like ages since I last posted! Sorry there wasn't a post last week, I was really busy revising for my exams and didn't have any time to take any photos or write anything. But, they're all done now so I had more time to write this!

This week's post is about making dream catchers. Dream catchers originated in Native America and they were made to protect a sleeping individual from negative dreams. The positive dreams could fit through the hole in the middle and slide down the feathers to the person below but the bad dreams would get tangled up in the web and disappear when daylight came.

They are usually made from a hoop of willow and decorated with beads or feathers. For my dream catcher I used an old bangle that is slightly sparkly so it adds a bit more decoration. I also used some black embroidery thread (but any type of string or cord would work), I wanted to use a colour that stands out against the hoop so that is is easier to follow each step. You will also need some beads or feathers (or anything else you want to decorate it with).


The first step is to tie a loose knot in the thread and then tie this onto the loop so that you have a ring at the top to hang the catcher with. 


You then need to pass the thread along, in front of the hoop, around the back and through the gap between the hoop and the thread. 


Repeat the last step all the way around the hoop and then pass the thread through on the next line of the hoop. You can add beads at this point if you like and you can add as many or as few as you like. 


To finish off the web, tie the remaining thread off at the side so that is is hidden. 


You can also add cord hanging down from the hoop with more beads and feathers attached to it. The decoration stage is all a matter of personal preference. 


I hope you liked this post and now have a pretty dream catcher to hang up and catch your bad dreams.


Until next time
Grace
X