Saturday 31 October 2015

Spooktacular crafts

Hey guys!

Happy Halloween! I hope you've all got your costumes ready and carved your pumpkins. For the first year in a while I'm not actually going to be at home this evening, I'm going to see Spectre instead (Please don't tell me any spoilers!) and I'm super looking forward to it.

This post is just a few crafts for Halloween that I saw on Pinterest and knew I had to try out. Mine didn't work as well as I wanted (basically they failed), but I sort of know what went wrong, so I can pass on my tips for them.

First up is a spooky ghost lamp. It is essentially just a white plastic cup over the top of an LED tea light. I've had this cup for a few months and it's just been sat on my bedroom floor waiting to be used for something cool. I basically just drew a ghost face onto the cup and it looks quite cool when it's dark! If you fixed some smaller cups onto a string of fairy lights, you could make a cool string of little ghosts.


The next one is the one that totally failed! Jelly worms. To try and make them, I bundled some straws together in a glass, and tried to fill them with jelly. This was the first of my many issues with the worms. The jelly didn't stay in the straws, it just bled out into whatever glass I put it into, even when I put clingfilm over the end. Looking back, I probably should have put a layer of jelly in the glass first and then pushed the straws into it, but didn't. Let me tell you, when liquid jelly is around, kitchen counters get very sticky and jellied! The next problem I had was HOW TO GET THE JELLY OUT! It was next to impossible without breaking them or smushing the worms into mush... I think I definitely chose the wrong sized straws. They were very thin, which didn't really help the issue. If you're going to try this, you may want to think of a way to get it out, because I have no solutions. It seems almost impossible to get them out.


(sorry this photo is sideways!)


Finally, ghostly garlands. This one can be used like bunting for a party or to decorate for trick-or-treaters. I used small gemstones I used to collect as a kid but they were way too heavy, so I'd suggest maybe using a balled up piece of tissue or light bead. This should mean the bottom of the tissue hangs better to look like a ghost, rather than the upside-down one I ended up with.
For the ghost I tore a square of kitchen towel into 4 pieces, because it was 2-ply (I know, fancy right!) I also separated the layers to make it thinner. It was pretty easy to tie the bit of ribbon around it once I'd bunched up the tissue below the stone for the head.


Out of the crafts on here, I think the ghost garland is definitely my favourite. It's such a cool idea, and very simple and quick to make.


I hope you guys have a lovely week, and don't eat too many sweets this weekend!

Love, Grace x

Saturday 24 October 2015

Words on Jars

Hey guys!

This week has been a hectic one, I feel like that's been how every post has started the last few weeks! At the moment it kind of feels like I'm running head-first down a really big hill and can't stop! I definitely need this half term! The DIY this week is words glued onto jars. This creates such a cute little tea-light holder, and when the candle is lit, the words show up beautifully.


For this, I used a glue gun. It creates the perfect look for the words but it was a little difficult to get them looking as neat as I wanted. I don't think there's a way that you could mark the words on beforehand without it showing through though.


For this jar, I used a square one, which I’m pretty sure came from some kind of chutney or sauce. It looks cooler, in my opinion, because not many jars out there are square, at least, not that I’ve seen!


I think these jars would look great if the glue was patterned on one side with the word(s) on the opposite side. I think this would just make the words stand out that little bit more. You could even paint over the glue with glass paints (or pens) to create a kind of stained glass effect.


My favourite side is definitely the one that says hope, The letters came out the best and there was less residue left on the glass.

I hope you guys have a fantastic week!

Love, Grace x

Saturday 17 October 2015

Painted Vase

Hey guys,

I promised a DIY post last week and here it is, and on time for once! This week feels like it's gone so quickly, I can't believe it's the weekend already! I must have missed a few days or something!

Today's post is painted vases. This was an idea I saw a post on Pinterest about, although, I think they did it with wine bottles instead. Painting the inside just livens up the piece a little and makes it different to any others.


Mine hasn't actually come out exactly as I wanted it to. I mixed the paint with PVA glue to try and make it go further and spread more evenly but that seems to have added a lot of tiny air bubbles which I don't like! The top is a little patchy but if you look into the vase, the coolest thing is that it looks like tiny stars in different constellations on the bottom. I was going to have it so that the top wasn't painted (hence why there's sellotape around it in the first few photos) but then decided against it. I also probably should have used masking tape but unfortunately for me, I couldn't find it! By the way, sellotape does NOT work in the same way! Although, I'm sure a lot of you already know that!


The vase I had was £1 from a charity shop on the high street and I'm fairly certain that most charity shops will have vases, and the same goes for most other shops (if you want to splash out on a more expensive one)! The paint I used was just regular wall paint (which probably didn't help with the air bubbles and patchy-ness!). I'm not sure if it helped at all, but I mixed PVA glue into it (it did make it slightly more fluid though), although you may want to leave that step out.


To actually paint it I just poured the paint into the vase and swirled it round until it was completely covered (it looked pretty cool when it was partially done)! Once it was covered, I left it upside down on a piece (or 4) of paper to let the excess run out. This is what other people tend to do with things like this, so I figured it would probably be a good idea!


It needs to be left for quite a while to dry out (overnight is probably best) and you want to make sure the inside is completely dry before putting it to use. I love the look of the paint behind the glass and it just goes to show how much you can do with bits and pieces that would usually be overlooked for more fashionable or 'cool' items.


I hope you have a lovely week, and maybe don't chuck a load of paint into your best vase straight away! It also works for jars, which you can then put tea-lights (or LED ones) into to create a cute little candle holder.

Love, Grace x

Saturday 10 October 2015

Superdrug Haul

Hey guys,

I hope you've all had a lovely week! I'm sorry this post is a little late, I got caught up playing the beta Star Wars Battlefront (it's great by the way) because it's only available until tomorrow. Earlier on today I was in Superdrug, looking for a darker lipstick for Autumn. As per usual, I didn't just buy a lipstick, I brought multiple things! It's not like I broke the bank though, because I have a student discount card and had points to redeem. (At least, I hope I didn't!)


The first three items were from Barry M. I love all of Barry Ms products, They're affordable while still being really good quality. The nail polish I chose is a really lovely berry (Pomegranate) that is pretty similar to the Makeup Revolution one I got a while ago. I wanted to try a quick drying one because I always seem to paint my nails when I needed to be somewhere 10 minutes before! I also got an eyeshadow crayon, mostly because I've never used one before and wanted to see what they're like! (So I'll be getting back to you on that one). I also got a lengthening mascara ('showgirl') That has the prettiest packaging I've seen for a while on a mascara!


I also saw that there was £2.50 off these ecotools brushes, and I've seen multiple reviews saying that they're good quality. I'm not totally sold on the fact that they're double-ended but we'll see.


Now, onto the thing that I actually went in to get! Darker lipsticks. I picked up 2 in the end, one from Makeup Revolution (Reckless) and the other from Revlon (Feisty Flamboyante). They're actually pretty similar in colour, just one is slightly more pink than the other. The major difference, however, is that the Revlon one is a lip crayon. I haven't fully tried them yet but more information will come in the future.


I'm sorry (again) that this post is so late, and that it's a little short! Next week will be another DIY, so hopefully it will be a little lengthier. 

Have a lovely week

Love, Grace x


Saturday 3 October 2015

Paint(ed) Pots

Hey guys,

I hope you've had a lovely week! Before the post actually starts I just want to explain a few things to a couple of my friends who I sent this link to without explaining. Hey guys... You probably didn't know what this link was when I sent it, but I wanted to tell you that for the last year and a half, I've been writing this blog. Originally I started writing it as the skills section for my DofE, but it's become one of my favourite things to do; I love it! I've wanted to tell everyone about it for a long time but have always been too scared to; it was especially hard when our mock and real English exams included a question about having to write a blog post. I mean, there's just a shed load of irony in that! There wasn't a particular reason why I was scared, you guys aren't monsters, I think I also liked just having something that no-one else knew about. Anyways, welcome to my little internet space, I hope you like it, and I'm sorry for not liking Matched!


Back to the post, This idea came to me as I was making the key frame last week actually. I saw a mossy old terracotta pot down the side of our house and instantly knew I could make it cool! My mum also gave the idea of wrapping string around the top, which was the difficult bit as it really didn't want to stick! I think the post is a small one, I've seen much larger ones before but It would work with any size (as long as you had enough paint). I think the overall look would look really cute on the tiny pots that you can get, they'd look so sweet!


Anyway, to do this, you'll need; paints, paintbrush, a pot and newspaper/something to put the pot on when it's wet so it doesn't make a huge mess. PVA glue and string are also optional. For the paint, I was using the leftovers that I mentioned last week and I used 'Antique Ivory' and 'Azure'. You can choose whether or not to use 2 colours, I just kind of wanted to see what it would look like.


(Who remembers Art Attack? I used to love watching it and it's probably what made me so creative! I think this PVA is a little old now.)


I painted the outside first to see how the paint would go on, and I was pleasantly surprised! It went on really well and it only took about 2 coats to make it look smooth. The inside was a lot harder though! It took about 4 coats and still looks a little patchy, even though both paints are exactly the same make. I don't really mind about the patches though, they're squished into the bottom corner so aren't overly visible. If you want the rim to be neat and not have splodges (like mine does) then you may want to use some masking tape. I couldn't find any, even though I only had it last week!


If you want to wrap string around the top, put some PVA in an old tub or bowl and run the string through it to start with. This should coat it evenly and help it stick more. (Also, start from the bottom of the part you want to cover as it's easier). You will also get a little sticky at this point so either keep some kitchen roll or something to wipe your hands on, or wait until it dries and peel it off. I remember painting my hands all the time when I was little, just so I could peel it off again afterwards! Oh the things that entertain kids! If your string is quite fluffy then it may look a little slicked down (like when hair has too much gel in it) but once it's dry, you can rough it up a little by brushing your hands over the top.


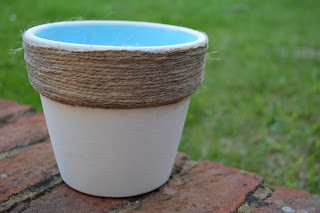
This post has a sort of summery feel to it but because the colours match my room, I think it will look super-cool with a fake plant (I would probably kill a real one!) or something cool in it! If you used outdoor paint then it would also look awesome if you had a collection of different coloured ones full of flowers!

I hope you all have a lovely week! Hopefully next week will be a September Favourites post, if I can think of favourites to write about! My mind always goes blank when I try to write a favourites post and I can only think of the same things as last time, or chocolate!

Love, Grace x